
Introduction to Mini Cheesecakes
Mini cheesecakes are the ultimate treat for young professionals balancing a busy lifestyle. With their perfectly portioned sizes, they eliminate the guilt associated with indulging in dessert. Imagine wrapping up a long day at work and treating yourself to a small, delectable cheesecake, knowing that you can enjoy it without overindulgence.
These bite-sized delights not only cater to your sweet tooth but also allow you to showcase your culinary skills during gatherings or casual get-togethers. With just a handful of ingredients — cream cheese, sugar, and graham cracker crumbs — you can create mini cheesecakes that look and taste gourmet. Plus, they're a great way to impress friends and colleagues with minimal effort.
Another bonus? They can be made in advance! Taking the time to prepare these little desserts can free up your schedule later in the week, making hosting or last-minute cravings much easier to manage. According to the American Psychological Association, indulging in small treats like mini cheesecakes can provide a boost of happiness, perfect for those demanding days.
Ready to dive into the delightful world of mini cheesecakes? Your taste buds are in for a treat!
Ingredients for Mini Cheesecakes
When it comes to crafting the perfect mini cheesecakes, using quality ingredients is essential for achieving that creamy, dreamy filling and a satisfyingly crunchy crust. Let’s dive into what you need!
Essential ingredients for the crust
The base of your mini cheesecakes will set the tone for the whole dessert. For the crust, gather:
- Graham cracker crumbs: 1 cup (120g) brings that classic flavor.
- Granulated sugar: 2 tablespoons (25g) adds a touch of sweetness.
- Unsalted butter: 3 tablespoons (43g), melted, is crucial for binding the mixture while imparting richness.
Each of these elements contributes to a deliciously satisfying texture that beautifully complements the creamy filling.
Essential ingredients for the filling
Now, onto the star of the show! Here’s what you’ll need for a smooth, luscious cheesecake filling:
- Cream cheese: 16 ounces (452g) should be full-fat and softened to room temperature for easy blending.
- Granulated sugar: ½ cup (100g) sweeps in sweetness without overpowering.
- Sour cream: ¼ cup (60g) brings tanginess and depth.
- Vanilla extract: 1 teaspoon will elevate flavors; opt for pure for the best results.
- Lemon juice: 1 teaspoon, freshly squeezed, adds a bright note.
- Eggs: 2 large eggs, also at room temperature, help achieve a creamy texture without cracking.
With these ingredients, you’ll be well on your way to creating delightful mini cheesecakes! For more inspiration on cheesecakes, you might enjoy checking out Sally's Baking Addiction for tips and tricks. Happy baking!
Step-by-Step Preparation of Mini Cheesecakes
Making mini cheesecakes is not just a treat; it’s a delightful experience that brings back fond memories. Whether you’re hosting a gathering or simply indulging in a tasty dessert, these steps will guide you through the entire process seamlessly.
Preheat the oven and prepare the muffin pan
Start by preheating your oven to 350°F (177°C). While that’s warming up, grab a standard muffin pan and line it with cupcake liners. This will not only make serving easier but also keep each cheesecake intact—a little trick for that wow factor when you present them!
Make the graham cracker crust
In a medium bowl, combine 1 cup of graham cracker crumbs, 2 tablespoons of granulated sugar, and 3 tablespoons of melted unsalted butter. Mix until the texture resembles wet sand. Now, firmly press a heaping tablespoon of this mixture into each muffin liner. It’s essential to pack it well so the crust holds together during baking. Bake the crust for about 6 minutes, just enough to set the shape.
Prepare the cheesecake filling
Now, let’s move on to that dreamy filling. Using either a handheld mixer or a stand mixer fitted with the paddle attachment, mix 16 ounces of softened cream cheese with ½ cup of granulated sugar until smooth (about 2 minutes). Add in ¼ cup of room-temperature sour cream, a teaspoon each of vanilla extract and fresh lemon juice. Once combined, add the room temperature eggs one at a time. Make sure to beat until just mixed to avoid overworking the batter.
Optional water bath method for foolproof baking
To ensure perfectly baked mini cheesecakes, consider using a water bath. Boil a pot of water and place a large metal roasting pan on the bottom rack of your preheated oven. Add hot water to the roasting pan—about an inch deep. The steam will help maintain moisture, preventing cracking.
Bake the mini cheesecakes
Carefully pour the cheesecake filling into your crust-lined muffin pan, filling each almost to the top. Bake them for about 20 minutes. You’ll know they’re done when the edges are set, and the centers slightly jiggle when you tap the pan.
Cooling and chilling process
After baking, let the pan sit on a cooling rack at room temperature for about 45 minutes. Then, transfer the cheesecakes to the refrigerator to chill for at least 2 hours (or pop them in the freezer for a quicker option).
Decorating the mini cheesecakes
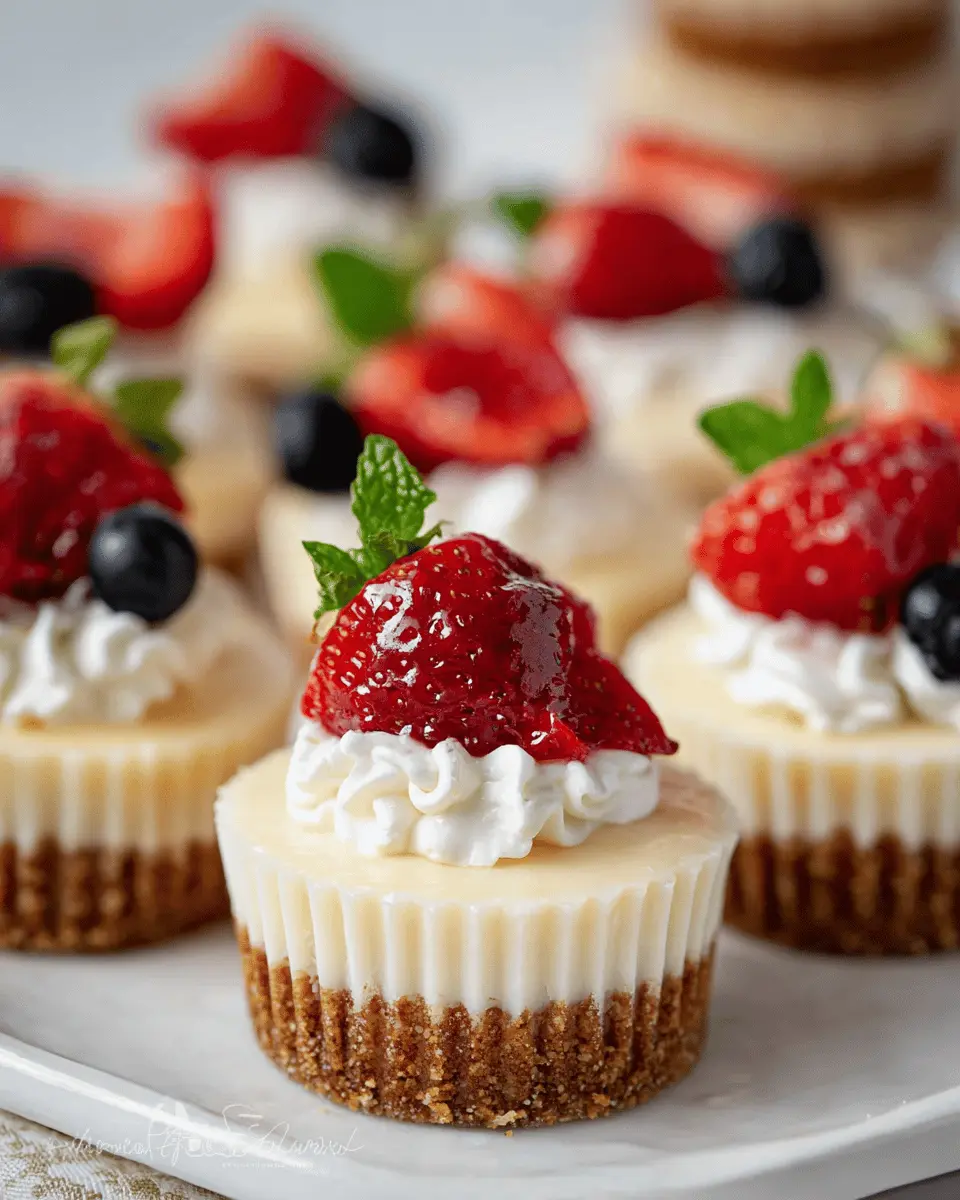
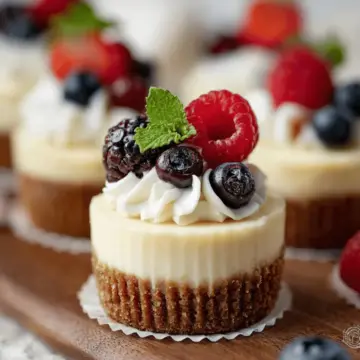
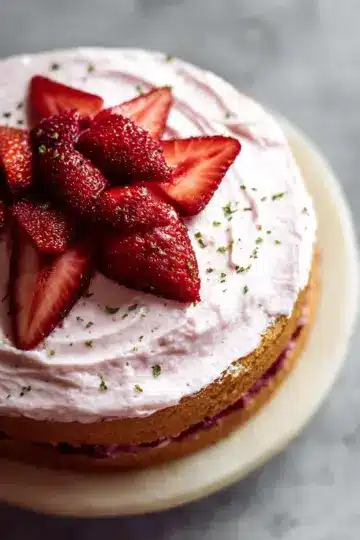
Finally, it’s time for embellishment! Pipe some freshly made whipped cream on top using a Wilton 1M tip for that professional touch. Garnish with fresh berries, mint, or any favorite toppings. The best part? You can make these in advance and enjoy the compliments later when you serve them!
With this step-by-step guide, you are well on your way to creating the most delicious mini cheesecakes that not only taste fabulous but also look stunning on your dessert table. Happy baking!
Variations on Mini Cheesecakes
Berry-topped mini cheesecakes
Elevate your mini cheesecakes with a vibrant berry topping. Fresh strawberries, blueberries, or raspberries add a burst of flavor and color that can brighten any dessert table. Simply layer your choice of berries on top after chilling the cheesecakes, and consider drizzling a light honey syrup or homemade whipped cream for added sweetness. For a quick alternative, store-bought fruit sauces work wonderfully too! You can check out more about topping ideas on sites like Sally's Baking Addiction.
Chocolate mini cheesecakes
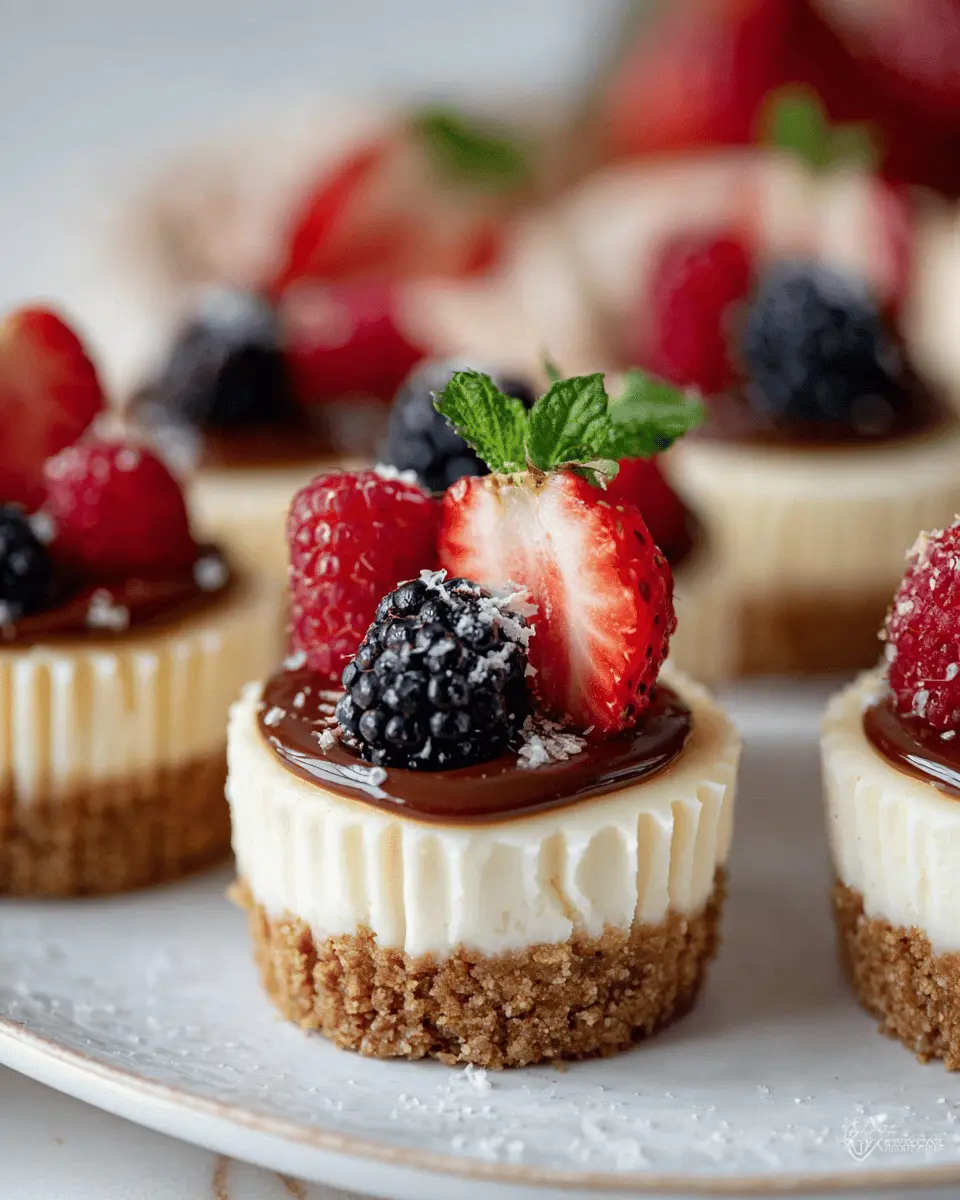
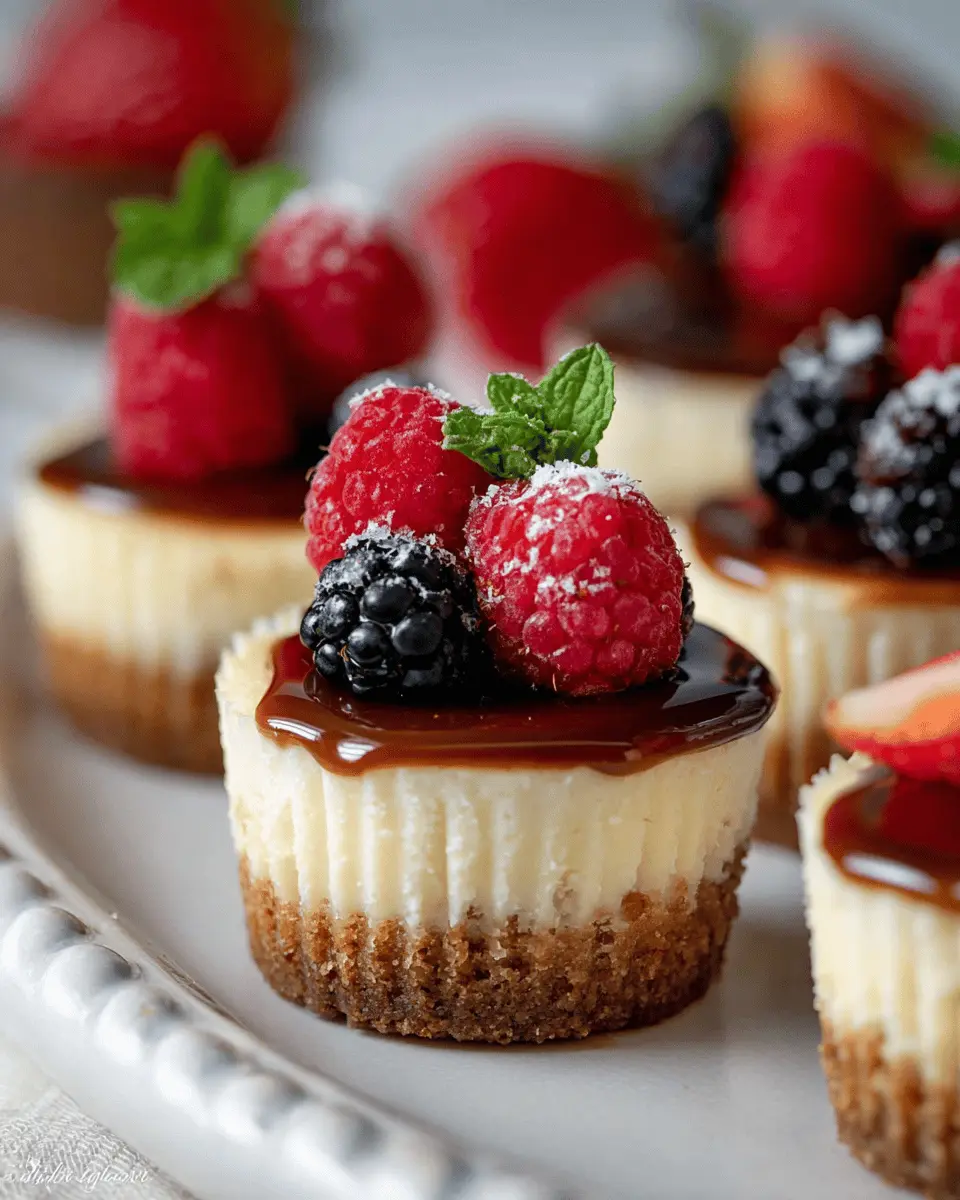
For chocolate lovers, transform your mini cheesecakes into heavenly chocolate bites. Incorporate melted dark or milk chocolate into the filling before blending, creating a rich, creamy texture. Top each cheesecake with chocolate ganache or shavings for that indulgent touch. You could also add a sprinkle of sea salt to enhance the chocolate flavor, making every bite irresistible. Curious about chocolate variations? Explore recipes on BBC Good Food.
Cooking Tips and Notes for Mini Cheesecakes
Tips for Avoiding Cracks in Your Cheesecakes
Cracks are the nemesis of perfect cheesecakes, but with a few simple strategies, you can keep your mini cheesecakes smooth and serene! Firstly, avoid over-mixing the filling; mix just until combined to prevent too much air from getting in. Secondly, a water bath can be a game changer, as it helps to maintain moist heat in the oven. Lastly, allow your cheesecakes to cool gradually: let them sit at room temperature before chilling in the refrigerator to avoid sudden temperature changes that cause cracks.
Notes on Ingredient Temperature and Quality
For the best results, ensure your cream cheese, sour cream, and eggs are at room temperature before mixing. This allows for a smooth and creamy filling without lumps. Quality ingredients are also key—a high-fat cream cheese will result in a richer, more decadent flavor. If you're feeling adventurous, try using organic ingredients for a cleaner taste. For tips on choosing the right products, check out this article on food quality.
Serving Suggestions for Mini Cheesecakes
Ideal Situations for Serving Mini Cheesecakes
Mini cheesecakes are perfect for a variety of occasions! Whether it's a casual weeknight dessert, a festive holiday gathering, or even a bridal shower, these delightful treats can elevate any event. Their individual portions make them an excellent choice for potlucks and parties, allowing guests to explore different flavors without commitment. Imagine a picnic spread where mini cheesecakes are the star, bringing smiles with every bite!
Pairing Mini Cheesecakes with Beverages
To create an unforgettable experience, consider pairing your mini cheesecakes with some delightful beverages. For an afternoon tea, serve them alongside a robust chai latte or a refreshing herbal iced tea. If you're planning a cozy movie night with friends, a creamy hot chocolate or a rich coffee can beautifully complement the cheesecake’s richness. To explore flavor pairings further, check out this informative guide on beverage pairings.
Time Breakdown for Making Mini Cheesecakes
Preparation time
Getting started with your mini cheesecakes takes about 15 minutes. This includes gathering your ingredients and mixing the crust and filling. If you want to streamline things, measure out your ingredients ahead of time!
Baking time
Once you're fully prepped, the baking process is quick—around 20 minutes. That’s just enough time to catch up on a quick episode of your favorite show or tidy up the kitchen!
Chilling time
Patience is key with these sweet treats! After baking, allow your mini cheesecakes to cool for around 45 minutes, then chill them in the refrigerator for at least 2 hours (or up to 24 hours if you can wait!). This chilling step is crucial for achieving that perfect creamy texture. For a quicker option, you can also place them in the freezer for an hour.
Overall, you're looking at around 3 hours from start to serve, but much of that is hands-off time waiting for them to chill in the fridge. Happy baking!
Nutritional Facts for Mini Cheesecakes
Calories
Each delectable mini cheesecake contains approximately 180-210 calories. This makes them a satisfying yet indulgent treat that won't completely derail your diet!
Sugar Content
Per serving, you can expect about 12-15 grams of sugar. This sweetness comes from both the crust and the creamy filling, creating a balanced flavor profile.
Dietary Considerations
These mini cheesecakes are best enjoyed in moderation, especially for those watching their sugar or calorie intake. You can experiment with lower-fat ingredients or sugar alternatives to make them more dietary-friendly. Check out this guide on healthy baking for tips and suggestions!
FAQ about Mini Cheesecakes
Can I make these mini cheesecakes gluten-free?
Absolutely! To whip up gluten-free mini cheesecakes, simply replace the graham cracker crumbs with a gluten-free alternative like almond flour or a store-bought gluten-free graham cracker mix. This ensures everyone can enjoy the indulgence without worrying about gluten.
How do I store leftover mini cheesecakes?
Storing your mini cheesecakes is a breeze. Place leftovers in an airtight container and keep them in the refrigerator for up to five days. If you haven’t topped them yet, they can last even a bit longer. Just remember to cover them loosely if chilling them for more than a couple of hours.
Can I freeze mini cheesecakes?
Yes, you can! Freezing mini cheesecakes is an excellent way to preserve them for later enjoyment. Wrap each cheesecake tightly in plastic wrap, then place them in an airtight container or freezer bags. They can be frozen for up to two months. When you're ready to indulge, simply thaw them overnight in the fridge.
Conclusion on Mini Cheesecakes
The joy of homemade mini cheesecakes for every occasion
Homemade mini cheesecakes add a delightful touch to any gathering, from casual get-togethers to holidays. They’re not just delicious; they're also customizable, allowing you to experiment with various toppings and flavors. Be it a birthday, a cozy dinner, or a festive celebration, these treats are sure to impress your guests.
For more inspiration and advanced cheesecakes, check out resources like The Cheesecake Lover for tips and creative variations!
Mini Cheesecakes: Easy, Indulgent Treats for Any Occasion
Equipment
- Muffin pan
- Mixer
- Medium bowl
- roasting pan
Ingredients
Crust
- 1 cup graham cracker crumbs (about 8 full sheet graham crackers)
- 2 Tablespoons granulated sugar
- 3 Tablespoons unsalted butter melted
Filling
- 16 ounces cream cheese full-fat, softened to room temperature
- ½ cup granulated sugar
- ¼ cup sour cream full-fat, at room temperature
- 1 teaspoon vanilla extract pure
- 1 teaspoon lemon juice freshly squeezed
- 2 large eggs at room temperature
Instructions
Preparation
- Preheat oven to 350°F (177°C). Line a standard 12-count muffin pan with cupcake liners.
- Make the crust: Combine all of the crust ingredients in a medium bowl. Mixture will be sandy. Firmly press a heaping Tablespoon of crust mixture into each liner. Bake the crusts for 6 minutes.
- Make the filling: Using a handheld or stand mixer fitted with a paddle or whisk attachment, beat the cream cheese and granulated sugar together on medium-high speed in a large bowl until the mixture is completely smooth and creamy, about 2 minutes. Add the sour cream, lemon juice, and vanilla extract, and beat until fully combined. With the mixer running on medium speed, add the eggs 1 at a time, beating just until combined before adding the next. Do not over-mix. Divide the batter among the liners, filling each all the way to the top. (It’s OK if the crust is still warm.)
- Optional Water Bath (prevents cheesecakes from excess sinking; skip this step if desired): Boil a pot of water. You need 1 inch of water in your roasting pan for the water bath, so make sure you boil enough. Place a large metal baking or roasting pan on the bottom oven rack of the preheated oven. Pour boiling water into pan, about 1 inch deep. Immediately place the cheesecakes on the center rack. Close oven to trap the steam inside.
- Bake until the edges are set and the centers slightly jiggle when you tap the pan, about 20 minutes.
- Set the pan on a cooling rack and allow cheesecakes to cool at room temperature for 45 minutes, then transfer to the refrigerator and chill for at least 2 hours and up to 24 hours. (Or place in the freezer for 1 hour to speed things up.) If chilling in the refrigerator for longer than 2 hours, loosely cover the cheesecakes.
- Top the cheesecakes: Use a Wilton 1M tip for piping whipped cream on the mini cheesecakes. Garnish with berries, mint, and/or other toppings. Whipped cream can be made and piped/spread on mini cheesecakes up to 24 hours in advance.
- Cover and store leftover cheesecakes in the refrigerator for up to 5 days.


Leave a Reply